Formatting made easy for picture book authors looking to self-publish!
 “Let’s tackle this together!”
I’m a DIY kinda gal. I’ve spent days working on a project by myself just so I could avoid forking over my money to the “pros.” Everything from sewing my own palazzo pants, to canning my own applesauce. I love to learn how to create things on my own. When I decided to self-publish my picture books I went with Amazon’s KDP (Kindle Direct Publishing). I really like the service and am very happy with the results. However, I struggled quite a bit during my first formatting. The provided templates were confusing and I couldn’t find much information online that was up to date. So, after A LOT of trial and error, I was able to bootstrap my way through the process. The next three books became easier and easier. Now I feel like I have a simple-to-follow method for formatting picture books. I am very excited to share it with you!!!

After starting your account with KDP follow the steps to create your title and acquire your ISBN #. Then select the Interior page. All of my picture books are full color (with bleed… we’ll get to that.) Select the Full-Color option for Interior and then the paper color will default to White. Then you select your trim size.
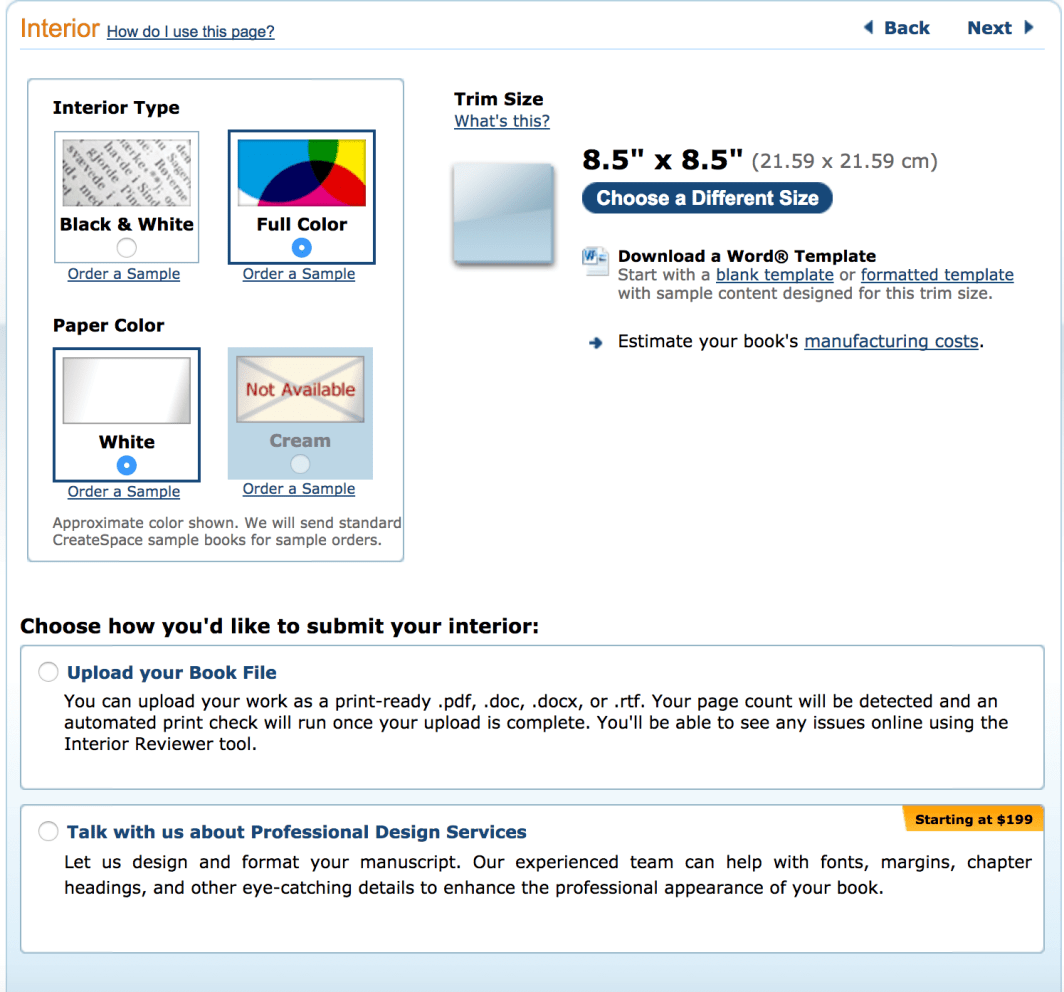
The example I am showing you today is from my latest book “The Shape Escape”. The final trim size for this title is 8.5” x 8.5”. Kindle Direct Publishing does offer landscape options and custom sizes if you click on more sizes. However, I would try and select a trim size that falls under the popular industry standard category. (Mostly portrait options.) Choose the one that is best for you. The sooner you know your final trim size the easier it is to create your illustrations. You will see what I mean very soon… (dramatic sound effect) “dun dun DUUUUN!!!”
Okay, take a deep breath now… We are about to do some math. Scroll down to the bottom of the Interior page and select PDF Submission Guidelines…
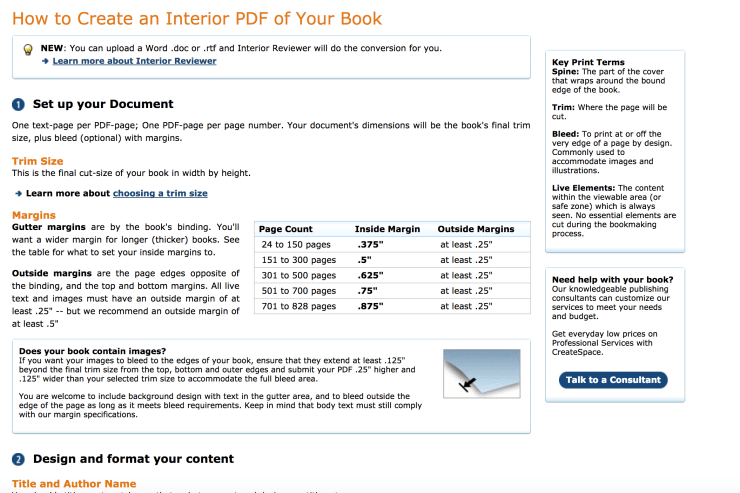
Did you read that, ahem, stuff yet? Yeah, I know… but we are in too deep now. No going back!
Here’s where we’re goin’ with this…
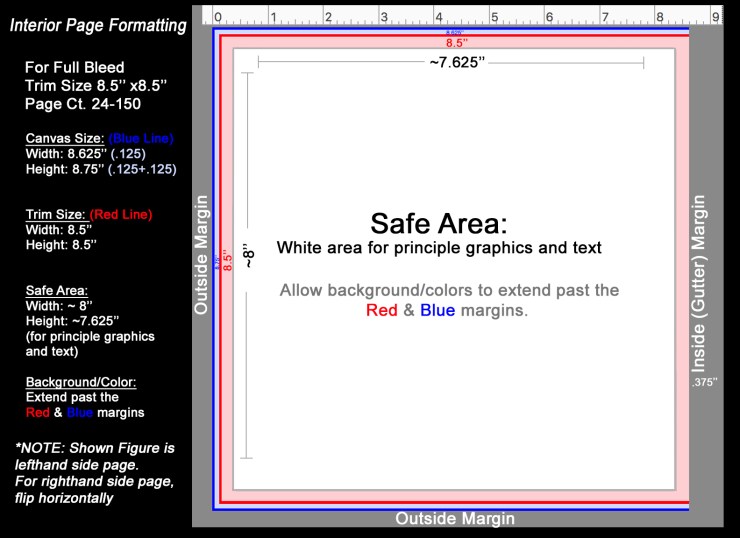
So the trim size I selected, 8.5” x 8.5” full-color with bleed, we will focus on the bleed area first. The space that falls beyond the final trim size. The top, bottom, and outside edges all have to be .125” past the trim size. So that makes our height 8.5” +.125”(added to top) +.125” (added to bottom) = 8.75 height. Okay for the width we need to add .125 to our trim for the outside edge. 8.5” +.125” (added to outside) =8.625. So our TOTAL size for our illustrations will be 8.625” wide by 8.75” high. Phew, I’m glad we figured all of that out…
BUT… gasp… here comes the dreaded MARGIN from the planet MARG!!!
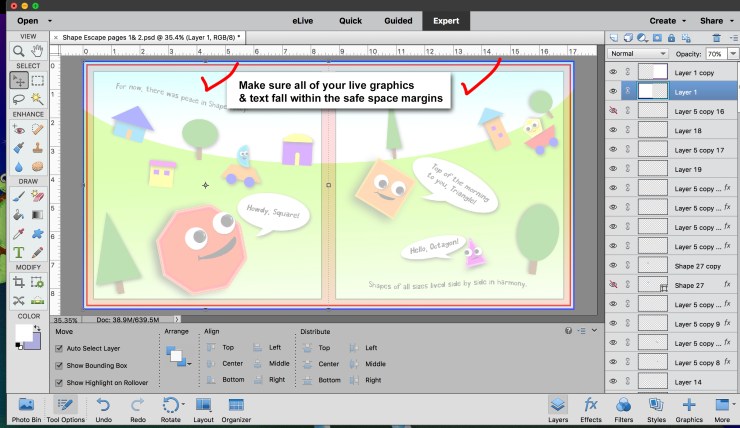
Let’s conquer this Margin Monster and find our “Safe Space”, the area in which our principle graphics and text must be contained. To make sure we are staying in the margins, let’s start with our top bottom, and outside edges again. Live text and images must be at least .25” away from the final trim edge, but .5” is recommended. However, we just added on an extra .125” to our edges. So we want to be more like .625” away from the top bottom and outside edge when we are illustrating.
Here’s how to conquer your inside gutter margin. Look back at that scary guide, you will see the table that calculates your inside margin measurement based on your page count. If you are writing a picture book, chances are you fall into the 25-150 page count category and therefore will have a margin of .375”

This makes our margin boundaries complete. I even recommend working .5” away from that safe area edge as well, just for good measure. Especially if live text or graphics fall close to the gutter margin edge.
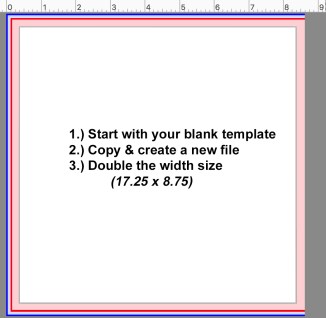
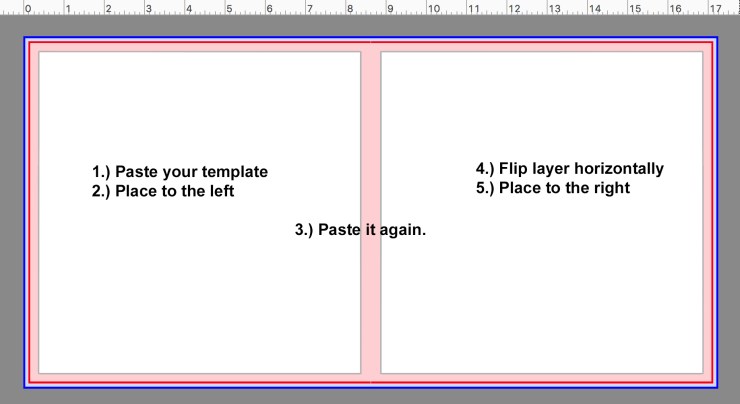
Now that we have made our custom template, let’s create a new file, double the width, and paste our template. Then paste again and flip that layer horizontally so they mirror each other. I used this template when creating my illustrations for “The Shape Escape”. By having the template as your guide right from the beginning, you save a lot of time when editing your final illustrations. Here are some examples of working with the template:
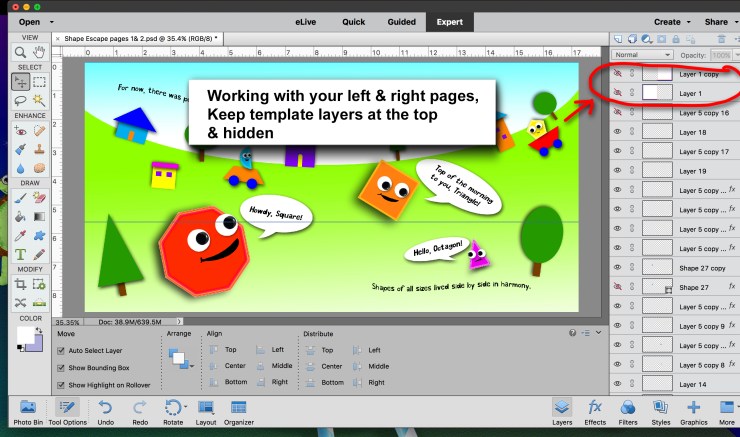
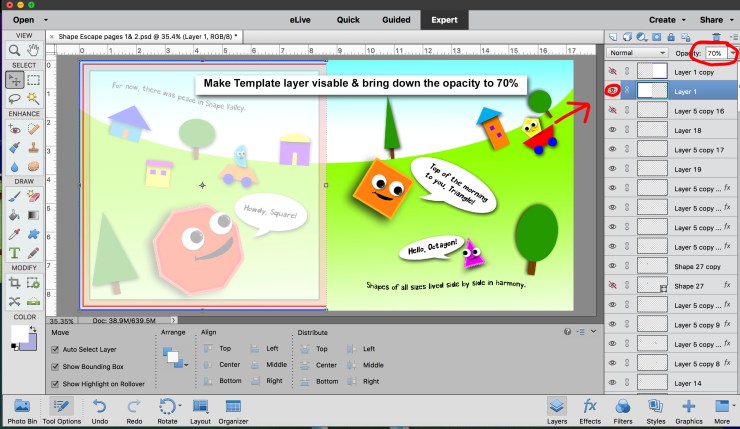
 This is how I keep things in line, (in shape?…) Do what works best for you!
Okay, we are almost there. After you complete your pages, let’s create a single file containing all of your pages. Open up your word processor. I have a Mac so I am using Pages.
*Sidebar: (the latest version of Pages does not have the mirror facing margins option but you can still format with this program. For other titles in black in white/text only I recommend using Pages 09 because this version does have a “facing pages” option… #themoreyouknow)
So open a new document in your word processor and resize the paper to your illustration size.
- To create a custom size in Pages go to File > Page Setup
- Click on the “Paper Size” tab and Select “Manage Custom Paper Size.”
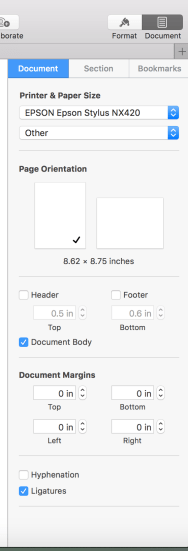
- Again, for the trim size 8.5” x 8.5” full-color with bleed, we ACTUALLY want our paper size to be 8.625” x 8.75.”

Now we uncheck the header and footer boxes in the “Document Tab” and enter a value of “0” for our Top, Bottom, Left, & Right Document Margins.
Then we start pasting our pages into PAGES!!! (or Word or whatever…)
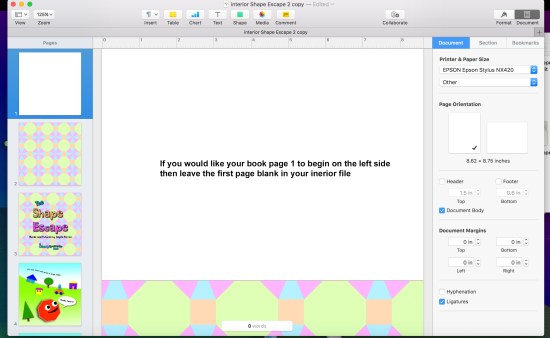
*Note: if your first two pages are interior title pages like mine, and you want page one to start on the left, then leave the first-page blank in your word processor.
When you have completed pasting your pages, double check everything and export your file to a .pdf, .doc, .docx, or .rtf. (I recommend PDF cuz it’s Pretty Darn Fabulous!)
Now you are ready to upload your file!!! HORRAY!!! YOU JUST PRE-PUBLISHED DIRECTLY ON KINDLE DIRECT PUBLISHING!!!
You can then launch the KDP Interior Reviewer and look over everything. Then if you are designing your own cover as well, you can follow the submission guidelines here…
I’m sure that after you have conquered interior formatting, the cover will be a breeze! If not, I have another tutorial coming soon…
I just want to say from one self-published author to another, congrats! This can be such a frustratingly tedious process. It took me FOREVER to format my first book and I cried literal tears. But now, after all that hard work I have a fantastic finished product. And soon… you will too:)
