Cover Story…

Hello again! If you are reading this you have just completed your interior picture book file and are ready to format your cover. After formatting the inside pages of the book, the cover will feel like a breeze. So first things first. Your final cover will be one complete file that includes the front, back, and spine. So it will look something like this:

Okay so let’s break this down. For my new book, Lawrence the Lighthouse, my final trim size is 8.5” x 8.5”. So to calculate the spine for the cover we will follow this provided handy (kind of?) Kindle Direct Publishing guide.
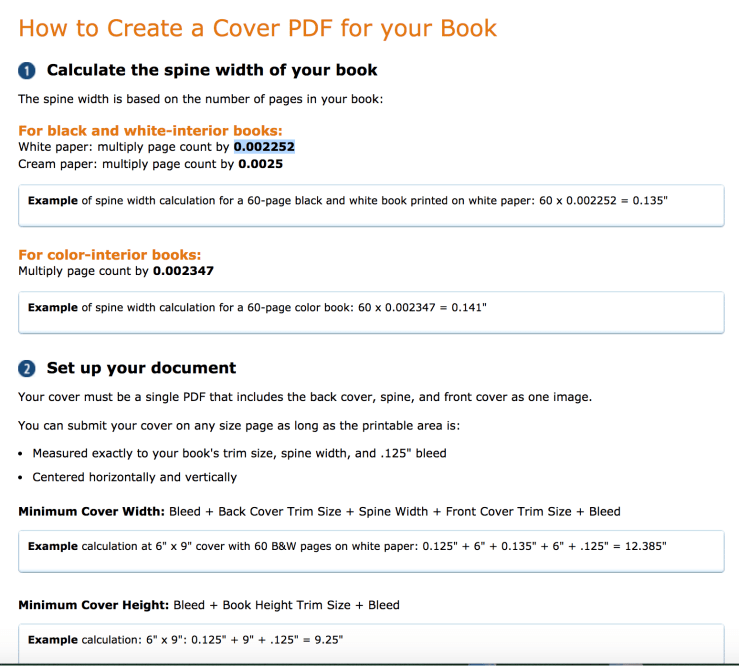
Spine: The width of the book spine is # of pages multiplied by 0.002252 (That’s if you are using white paper. If selecting the cream paper option you will multiply your page count by 0.0025.) So for Lawrence the Lighthouse, my total page count is 45 pages (this total page count includes the interior cover page, author page, copyright page etc…) So because I am choosing the white paper option I will multiply 45 x 0.002252 to get a total spine width of 0.10134”.
Now if you are working in full color with bleed, you will need to allow for an additional 0.125” on all sides of your final trim size.
Width: So the total width of your cover file will be Back Cover Width +0.125” + Spine Width + Front Cover Width +0.125”.
For Lawrence the Lighthouse my Back Cover Width is 8.5” +0.125” + my Spine Width of 0.10134” + my Front Cover Width of 8.5” +0.125” which equals a total width of 17.35134”
Height: Calculating the total height of your cover file is even easier because the height is the same across the board so to calculate it you simply take your Cover Trim Size Height + 0.125” to the top + 0.125” to the bottom.
The total height for Lawrence the Lighthouse with a trim size of 8.5”+ 0.125” + 0.125” which equals a total height of 8.75”
So now, open up a new blank file with your newly calculated width and height measurements. My cover size is 17.35134”x 8.75”. Then paste your cover images onto the file and make sure any live elements on for your front and back within the 0.125 margins.

ISBN Barcode: One last thing… you need to include a white rectangle on your back cover. This is where the unique ISBN barcode for your book will be printed. The white rectangle must be 2” wide x 1.2” tall. The way I get the exact measurement is to open up a new file 2”x 1.2”, fill the selection with the paint bucket then copy and paste my new perfectly sized rectangle onto my cover. (Making sure it lands in the safe area.) I like to put this baby in the back left corner…sorry Jerry Orbach…
PARTY!!! And here we are!!! Our book cover is complete and ready to be submitted for review by KDP. Once approved you are ready to print your book and soon the whole world will be judging your book by its’s fabulous cover.

